Posted on

Lasagne Bolognese Recipe – GialloZafferano’s Recipe

Lasagna Bolognese

Lasagne alla Bolognese is an institution, the typical Sunday dish. This rich and tasty dish is originally from Emilia and, specifically, from the city of Bologna. However, lasagna is known, appreciated, made, redone for parties and not only that, tasted and shared not only throughout Italy, but also abroad as a symbolic Italian dish. Layers of green egg pasta, topped with the classic ragout of tradition, béchamel and grated cheese. Obviously there is no shortage of lasagna which is numerous and delicious variants like that squash and sausage , with mushroomsthe mountainperfect for autumn menus, that one with artichokes for the winter and spring season, or that white, without tomato. From the preparation to the ingredients, this recipe is the quintessence of the “richness” of traditional Bolognese cuisine, also famous for many other fresh pasta recipes and more, just think of the fried dumpling. You just have to prepare it and enjoy it in the company of your family for a very special day!


Read the recipe in English

To prepare lasagna alla bolognese, start with the ragù. Prepare the vegetable broth that you will need to keep warm. Then take the bacon, cut it first into strips 1. With a knife or a crescent, chop it well 2. Separately, prepare finely chopped carrots, onions, celery and keep it aside 3.

In a saucepan, pour a drizzle of oil and the bacon. Grate it well with a ladle 4 and let it brown for a few minutes. Then add the chopped vegetables 5 and cook for 5-6 minutes 5. Then add the minced meat 6. Stir and raise the flame. Let the meat brown without haste, it must be well browned to seal the juices and be soft and not stringy.

Deglaze with the red wine 7then wait until it has completely evaporated and add the tomato puree 8. Stir, the ragù must cook for two hours. When it starts boiling again, you can add a little hot broth, one or two ladles 9. Then let the ragu go for at least a couple of hours.

You will have to cook with the lid on, without closing it completely 10. Check and stir from time to time, if necessary add more broth and cook for the indicated time. Now move on to the pasta. First, pour the spinach into a pan 11add a little water, cover with a lid 12

and let cook until they are wilted, in total it will take 5-6 minutes 13. At this point drain them, let them cool and squeeze them well 14. Transfer them to a mixer 15

and blend them until you get a puree 16. You will have to obtain 100 g of it. Now on a pastry board pour the semolina and the 00 flour 17, add the spinach and create a fountain shape. Add the lightly beaten eggs 18

and the yolks, always beaten 19. Start kneading everything starting from the center 20, this way the eggs will not slip out of the fountain. Mix well until you get a homogeneous dough 21.

Wrap it in foil 22 and let stand for 30 minutes at room temperature. In the meantime, prepare the béchamel, always remembering to check the ragù. In a saucepan, heat the milk 23without boiling it. In another pan, pour the butter 24 and let it melt.

Add the flour in one go 25 and cook for a few minutes until a golden roux is obtained 26. Then pour the hot milk in 3 times 27mixing well.

Add salt and flavor with nutmeg 28. Keep mixing until you get a creamy bechamel 29. Transfer to a bowl, cover with cling film and set aside. As soon as the 30 minutes have elapsed, take back the dough stick and take a piece of it 30. Cover the remaining dough with plastic wrap to keep it from drying out.

With the help of a little semolina, flatten it slightly on the pastry board to form a rectangle and roll out the dough in the machine. Start with a larger thickness, then fold the pastry back on itself and pass it over again. When you feel it is too wet, sprinkle with a little semolina. Gradually reduce the thickness until you get a sheet just over half a mm thick. Transfer it to a pastry board and cut into 30x20cm rectangles 32. Continue in this way until the dough is finished and in the meantime put a pot full of water on the fire and salt it. When it starts to boil, add one sheet at a time 33,

wait 30-40 seconds and with the help of a slotted spoon drain it 34. Transfer it to a tray with a tea towel 35 and dab to remove excess water. Continue in this way placing the cooked sheets side by side, without overlapping them. As soon as the ragu is ready too 36 season with salt and pepper and proceed with the composition of the lasagna.

Take a large lasagna pan 30×20 cm and butter the bottom 37. Add a thin layer of béchamel and one of ragù 38. Then place the first sheet 39,

add a layer of béchamel and one of meat sauce 40. Add the grated Parmesan 41 and place another sheet of pasta on top 42.

Add another layer of béchamel and one of meat sauce 43add the grated cheese 44 and continue like this until you have 5 layers. After placing the last sheet, add the ragu 45

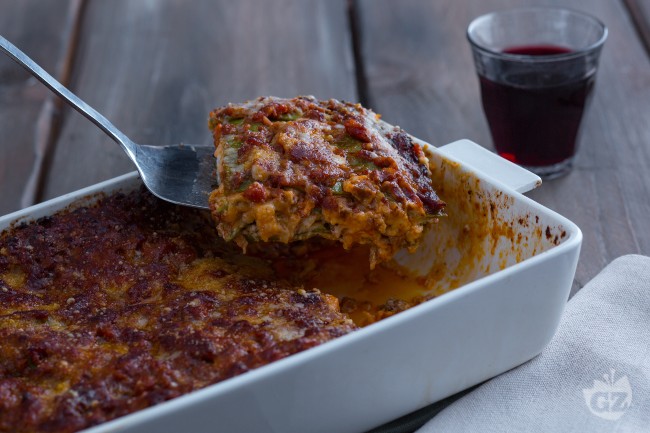
so as to completely cover the dough 46. Sprinkle with grated cheese, add tufts of butter 47 and cook in a preheated static oven at 170° for 40 minutes. The lasagna alla bolognese is ready to be served. 48.

There are so many variations of Bolognese sauce.

If you prefer, at the end of cooking, you can add a glass of milk or a pinch of sugar. It will serve to dampen the acidity of the tomato. In the past, milk was also used to dampen the wild taste of the meat during cooking, but it is something that is rarely or no longer done today.

Some people use a mix of pork and beef to get a fat mix at the right point. We advise you to use, in addition to the bacon, the beef tenderloin or in any case a not too lean cut.

Instead of vegetable stock, you can use hot water or meat stock. It is important to add the broth as needed.

Wait for the meat to be well browned before deglazing with the wine, we chose the red one but some also use white wine.

Cooking times may also vary: we advise you to cook the ragù for at least 2 hours. You can prolong the cooking by checking it often and adding more broth as needed.

Posted on

Sweet and savory crepe recipe (basic recipe)

Sweet and savory crepes (basic recipe)

Whether it’s a loving mother preparing a snack, a group of students taking a break from studying or fanatics of quick but still original cooking, the cracks are always the right choice! In this recipe for sweet and savory crepes, you’ll find out how to adapt the neutral dough to the most delicious fillings, give them Nutella crepes at gorgonzola and radicchio crepes, baked or al dried ham! There are only a few things you need to know to be able to prepare perfect sweet and savory crepes, we’ll tell you about them right away! We are sure that you will stock up on them, discovering how easy it is to keep them! But then let us know which one is your favourite!

Here are more recipes for making crepe dough that meets all your needs:


Read the recipe in English

To prepare the sweet and savory crepes, start by gently melting the butter in a saucepan 1. Let it cool and in the meantime break the eggs into a bowl with high sides. Mix with a whisk and add the milk 2. Continue to mix until a homogeneous mixture is obtained 3.

Now add the warm butter 4 and mix again 5. Place a sieve over the bowl and then sift the flour into the bowl 6(for convenience you can also add it in two stages and mix so as to avoid the formation of lumps).

Then with the whips mix vigorously to absorb the flour 7. Continue to mix until you obtain a homogeneous, velvety and lump-free mixture 8. At this point, cover the bowl with cling film 9 and let it rest for at least 30 minutes in the refrigerator.

Once the time has elapsed, mix the dough to revive it and then heat an 18 cm crepe maker (or alternatively a non-stick pan of the same base) and grease it with a knob of butter 10. Once at temperature, pour a ladleful of dough enough to cover the surface of the pan 11: you can help yourself with the appropriate batter spreader for crepes or rotate the pan to distribute the mixture evenly (be careful not to spread it all over the edges to avoid that there is not enough batter left in the center to create a crepe with a uniform surface); it is advisable to carry out these operations very quickly, as the batter will cook quickly 12.

After about 1 minute on medium-low heat, you should notice a slight browning, the edges will tend to come off 13 therefore you can turn the first crepe with the help of a spatula 14. Cook the other side for about 1 minute, waiting for it to brown. Once cooked, transfer it to a serving plate or cutting board. Repeat this operation until the dough is finished, greasing the crepe maker from time to time, you should thus obtain 14 crepes with a diameter of 18 cm: stack each crepe on top of the other so they will remain soft. Your sweet and savory crepes are ready, all you have to do is fill them 15!

You can leave the crepe dough to rest for up to 12 hours in the refrigerator, covered with plastic wrap.

If you prefer, you can also freeze the sweet and savory crepes once ready and let them cool: just arrange them one on top of the other and, between one crepe and the next, place a sheet of parchment paper and finally seal everything with plastic wrap.

Before using the desired quantity, it will be sufficient to let them thaw and then fill them. The sweet and savory crepes can be kept individually in the fridge for a couple of days, covering them with transparent film, so as not to let them dry out.

In the basic recipe neither salt nor sugar are added, in this way the mixture of the sweet and savory crepes will remain neutral. But if you prefer you can easily adjust them according to taste.

The butter added to the dough is used to make the crepes more full-bodied, if you prefer you can omit it.

The rest of the batter is essential for a perfect result, in fact, once the flour has been poured in, it is better not to mix too much and the rest will ensure that any lumps disappear!

Posted on

Chatter

Chatter

Chiacchiere are crunchy and delicate fried sheets typical of the period of Carnival and are called with different names according to the regions of origin: Chatter And lettuces in Lombardy, Cenci And damsels in Tuscany, milkshake And sfrappole in Emilia, crostoli in Trentino, galani And gale in Veneto, lies in Piedmont. It’s still rosettes, lasagna, papules.. I am a very crumbly dessert, obtained by thinly pulling a simple dough which is then fried and sprinkled with icing sugar for the final touch. Their rectangular shape, with two central clean cuts, makes chatter unmistakable and has immediately attracted the gluttony of young and old since time immemorial. Whether it’s the first or the millionth time you’ve tasted one, every bite of the chiacchiere is magic… and it’s immediately Carnival!

Also try these variations and others Carnival sweets:


Read the recipe in English

To prepare the chiacchiere, sift the flour together with the baking powder and pour into a planetary mixer with a leaf attachment. Add the sugar 1the salt, the previously beaten eggs 2the yolk and the grappa 3. Process until the ingredients are well blended.

Replace the leaf with the hook 4add the seeds of the vanilla bean and the butter 5, then continue to knead for 15 minutes until a homogeneous mixture is obtained: it must be firm but quite malleable. If necessary you can add 5-10 g of water. Transfer the dough to a work surface, and handle it quickly to give it a spherical shape 6.

Wrap the dough in cling film and let it rest at room temperature for at least 30 minutes 7. After this time, divide the pasta into portions of approximately 150 g and start working each one individually. Slightly flatten a first portion with the palm of your hand 8flour it and roll it out with the tirapasta set to the widest thickness 9.

Fold the short sides of the strip of pasta obtained towards the centre 10then roll it out again, each time setting the pastry cutter to an increasingly smaller thickness, until it reaches 2 mm 11. Perform the same procedure on all portions of dough. Leave the rolled dough to rest for a few minutes and in the meantime bring the oil to a temperature of 150-160°. With a scalloped wheel, proceed by shaping rectangles of about 5×10 cm and making two central cuts on each one, parallel to the long side 12.

As soon as the oil has reached the right temperature, dip 2-3 rectangles of puff pastry with the help of a slotted spoon 13 and cook them turning them on both sides until they reach a golden colour. Drain the sheets on absorbent paper and, once cold, plate them and sprinkle them with plenty of sifted icing sugar 14.
Your chats are ready 15.

Posted on

Roast with cream

Recipe description

L’cream roast it is a simple dish with a surprising result prepared with turkey breast and a tasty sauce made with cream and vegetables.

Roast with cream is a tasty second course which in this version becomes a refined dish suitable for special occasions such as that of Christmas.

For an important dinner or lunch like that of Christmas try the cream roast recipean excellent dish to make a good impression with your guests.

If you are looking for other ideas to complete your Christmas menu consult the section Christmas recipes by Chefsilvia. Enjoy the reading.

Roast with cream

Recipe ingredients

  • 1 kg and 200 gr of turkey breast (or veal)
  • 200 ml of meat broth
  • Salt and Pepper To Taste
  • 1 onion
  • 1 carrot
  • 3 spoons of extra virgin olive oil
  • 40 g of butter
  • 250 ml of white wine
  • 100 g of sliced ​​bacon
  • 250 ml of fresh cream
  • 1 sprig of rosemary
  • 3 sage leaves
Posted on

Apple pie

Apple pie

Podcast recipe

Duration 2:53 – Steps 8

The apples they have always been the undisputed protagonists of homemade desserts, like our delicious, soft and aromatic apple pie, it is the best comfort food you could wish for! After all, those who have tried it know how reassuring a homemade apple pie is, with its simple sweetness, its soft consistency and its unmistakable scent. Timeless flavors that evoke family memories, each with its own recipe to be jealously guarded as the most precious of treasures. Here we reveal our version of apple pie, perfect for indulging in a delicious cuddle with your loved ones. Bad variants there are many: from that Vegan to that light or to the water, without butter, without eggs or with mascarpone cheese, with invisible apples or in rays!

Do you love apples? Check out the delicious too Dessert with annurche and eggnog and the microwaved apples!


Read the recipe in English

To make the apple pie, first melt the butter in the microwave or in a double boiler, and keep it aside. Grate the lemon zest 1 and squeeze the juice obtaining about 30 g 2, then set aside both the zest and the juice. Cut the apples in half and remove the core 3,

Peel the apples 4then cut them into four parts 5 and cut them into slices by cutting them along the short side 6.

Put the sliced ​​apples in a bowl and drizzle with the lemon juice 7, mixing them well: this operation will serve to prevent them from blackening. Then sift the 00 flour with the baking powder 8. Then, in a large bowl, pour the eggs 9

and part of the dose of sugar, 10. Start beating with electric beaters 11 and continue pouring the sugar a little at a time 12.

When the mixture starts to lighten, add a pinch of salt 13 and continue beating until you obtain a light and frothy mixture. At this point, add the melted butter brought back to room temperature 14. Flavor with ground cinnamon 15

and also add the grated lemon zest 16. Then, still continuing to whisk, add the sifted flour and baking powder one spoon at a time 17. When the powders are fully incorporated, lower the speed of the electric whisk and slowly pour in the milk at room temperature 18.

When the milk is completely incorporated, stop the whips: the dough is ready 19. Separately, drain the apples in a colander to remove the lemon juice 20 and pour them into the dough 21.

Gently mix from bottom to top to incorporate them well 22. Grease and sprinkle with sugar a 22 cm diameter cake tin and, using a spatula, pour the mixture 23. The cake is ready to be baked 24: cook it in a preheated static oven at 180° for about 55 minutes.

When cooked, take it out 25 and let it cool completely before removing it from the pan. Dust the cake with icing sugar 26 and serve 27: your apple pie is ready to be enjoyed!

Posted on

Custard

Custard

Podcast recipe

Duration 2:27 – Steps 5

Eggs, milk, sugar and vanilla. Few ingredients for one of the most popular creams: custard. Let’s find out together with the Master Pastry Chef Iginio Massari how to make the perfect custard. This cream is among the most used in pastry, together with chantilly or lo eggnog, to fill many desserts. In cream puffs, in puff pastry desserts (such as cannoncini, vol-au-vent, millefeuille), but also among the soft layers of the more classic Sponge cake custard is always welcome, even flavoured: pistachiolemon, hazelnuts, orange! This basic pastry preparation is also used to make semifreddos, puddings and many puddings, such as our delicious one tile cake; moreover it is a fundamental component of other pastry creams, for example the diplomatic and the mousselines. It is a very versatile preparation: just change the doses of some ingredients to obtain different and appropriate consistencies for the use you will make of them! For example, to thicken it more it is sufficient to use more cornstarch, on the contrary you will have to decrease the dose if you would like to taste it by the spoon. Follow the procedure step by step with Master Pastry Chef Iginio Massari and discover all the tricks to prepare it!


Read the recipe in English

To prepare the custard, first place a glass bowl in the freezer. At this point, extract the seeds from the vanilla 1 and cut the pods into pieces 2. Pour the milk into a pan and add both the seeds 3 than vanilla pods.

Remove the zest from the lemon, taking only the yellow part, and add it to the pan 4. Turn on the heat and heat everything up, bringing it to a boil and stirring occasionally. In another pan, pour the egg yolks, sugar and rice starch 5. Using a soft whisk, mix to obtain a creamy and smooth consistency 6.

As soon as the milk is close to boiling, transfer it into the yolks in 3 times, filtering it with a strainer 7 and always mixing with a whisk 8. Transfer back to the heat and stir continuously until it thickens 9.

To cool it quickly, take the bowl out of the freezer and pour the cream inside 10. Mix with a whisk very quickly, until you have brought the cream to 50°, below the cooking point. You will have to obtain a smooth and very shiny cream 11. At this point the custard is ready 12you can use it or store it in the refrigerator by covering it with plastic wrap.

Use rice starch to obtain a softer cream, otherwise if you prefer a thicker cream, use the same dose of corn starch.

Never leave the yolks in contact with the sugar without stirring, otherwise they will cook and the cream will be lumpy.

By heating the milk previously, the yolk will suffer less from the high temperature, giving the aromatic taste a particular freshness.

With these doses you will be able to fill a 22 cm diameter cake, making two layers of cream.

Posted on

Spaghetti Amatriciana Recipe – GialloZafferano’s Recipe

For an Amatriciana with a capital “A”, Pecorino Romano DOP will be fine, Amatrice’s is even better.

As you can see, to brown the guanciale, no other fats are used, at most you can add very little olive oil, but it’s not essential. The bacon fat will melt and create the right base to flavor the sauce.

If you don’t have fresh chilli you can replace it with dried chilli or pepper. Otherwise, omit it.

The traditional pasta format is spaghetti, if you prefer you can use bucatini!

The iron pan is excellent for browning and at the same time preserving the aroma and taste of the bacon. It is the one that many restaurants still use to prepare the traditional amatriciana. Alternatively, it is advisable to use a pan with a steel bottom.

Why is it better not to replace bacon with bacon? Because the guanciale is more delicate, with its two parts of fat and one of meat, it has an almost sweetish taste that goes perfectly with the flavor of Pecorino Romano.

Posted on

Receta e supës me lazanja të dekonstruktuar

Duke filluar me bazën e mishit, do t’ju duhet pak vaj ulliri, mish viçi i bluar, sallam italian, qepë, hudhër, pastë domate dhe kanaçe domate të qëruara. Mund të përdorni ½ mish viçi dhe ½ sallam, ose 1 kile nga njëra ose tjetra. Përdorni sallam të butë pa nxehtësi, ose sallam të nxehtë për pak goditje.

Për të bërë lëngun e supës, do t’ju duhet lëng pule ose perimesh, rigon i freskët, trumzë e freskët, kripë, piper, pesto dhe së fundi, petë lasgna. Ju mund të përdorni ujë nëse nuk keni stok në dorë dhe erëza të thata nëse nuk gjeni ndonjë të freskët. Nëse nuk keni një bollëk borziloku që duhet të përdorni, përdorni pesto të përgatitur paraprakisht për ta mbajtur këtë recetë të shpejtë dhe të lehtë. Për sipër, do t’ju duhet rikota me qumësht të plotë, disa degë të tjera rigon dhe trumzë dhe pak kripë.

Posted on

Tenderina cake recipe – GialloZafferano’s recipe

Tenerina cake

The tender cake is a Sweet typical of the city of Ferrara, which thanks to its gluttony has conquered the whole country … in fact, no one can resist a slice of this fantastic chocolate cake! Will it be thanks to the fragrant external crust or its melting consistency in the mouth with every sip? We fell in love with both, but one thing is certain: its intense flavor of chocolate everyone agrees! The tenerina cake is a cake with few ingredients, without yeast which has the particularity of remaining low and moist inside, just as the name suggests: in the Ferrara dialect it was also called “Torta Taclenta”, which in Italian means sticky.

A simple dessert to make, with guaranteed success: to bring out all its flavor try serving it together with a delicate one mascarpone creamyou will feel that goodness .. perfect for any occasion and for father’s Day!

Here are other versions to try:


Read the recipe in English

To prepare the tenerina cake, start by finely chopping the chocolate 1then transfer it to a bowl placed in a pan with water (if possible the water should not come into contact with the bottom of the bowl or saucepan in which you poured the chocolate) and melt it in a bain-marie, stirring constantly 2. Only when the chocolate has already melted, but not too hot, add the butter cut into pieces 3.

Let this melt too while continuing to mix 4. Since the exact melting temperature of chocolate is around 50°, the butter should be added only when the chocolate has melted, making sure that it does not exceed its melting point (which is around 32°), and thus avoiding separate. Let the chocolate and butter mixture cool, stirring it from time to time, and in the meantime separate the yolks from the whites in two different and large bowls. At this point add half of the sugar to the latter 5 and whip them until the mixture is firm and frothy 6.

Set aside the whipped egg whites and pour the remaining sugar into the yolks 7then whip everything at moderate speed until the mixture is clear and frothy 8. At this point, with the whisk still in action, slowly pour in the now lukewarm chocolate and butter mixture 9.

Keep beating until you get a uniform mixture 10. At this point, add the whipped egg whites in several stages: initially add about 1/3 of the egg whites 11 mixing with a spatula 12 or with a whisk.

Then incorporate the remaining egg whites this time mixing gently from bottom to top 13. Add the previously sieved flour 14 and always mix with a spatula making delicate movements from bottom to top 15.

You will have to obtain a smooth and uniform mixture 16. At this point, butter and flour a 24-26 cm springform pan (this will make it easier to take the torte from out of the mold) and pour the freshly prepared mixture into it (17-18). Bake in a preheated static oven at 180° for 25 minutes (the use of a convection oven is not recommended as it could cook the outside of the cake too much and the inside too little).

Once baked 19 let your cake cool down before unmolding it. Decorate with icing sugar 20 and serve 21.

Instead of a bain-marie, you can also melt chocolate and butter in the microwave.

If you love a low tender cake, use a 26 cm mould, if you prefer it a little taller, use a 24 cm large mould. In both cases it is preferable to use a springform pan, in this way it will be easier to unmold the cake.

Let the cake cool down before removing it from the mold and cutting it, otherwise the crust could break too much.

If you are looking for a gluten-free version try the recipe of the Flour free chocolate cake!

Posted on

Spaghetti Carbonara

Spaghetti Carbonara

Where did spaghetti carbonara originate? The Vicolo della Scrofa, for those who know Rome, is one of the most characteristic streets full of symbols. Precisely in a trattoria on this street, from which the name of the alley derives, the first carbonara seems to have been made, in 1944. The most reliable story on this first course, in fact, tells the encounter between the ingredients available to American soldiers and the imagination of a Roman cook. The result was the prototype of spaghetti alla carbonara: eggs, bacon (then bacon) and cheese. Little by little, the recipe evolved to the one we all know today and can appreciate at the home of true (and voracious!) Roman friends, in trattorias and starred restaurants in the capital, throughout Italy and abroad, in the countless versions: with or without pepper, with one yolk per person or the addition of at least one whole egg, with bacon or bacon.
The sauce for the carbonara is prepared in a matter of minutes, like many other Roman delicacies (think of the cheese and black pepper!). Just think that all you need is spiced bacon cut into strips, a golden cream made with egg yolks (in our version) and lots of freshly grated Pecorino Romano.
In its simplicity and richness of raw materials, the recipe for spaghetti alla carbonara is a close relative of two other cornerstones of genuine Italian cuisine: thetomato and bacon and the gray! He also winks at the zozzona pasta, a robust dish that combines the best of the basic preparations of Lazio cuisine. Take a dip into popular Rome with us and find out how to make super creamy spaghetti alla carbonara, let us know if you like our version and, if you’re curious about the idea of ​​tasting other variations, try also:


Read the recipe in English

To prepare spaghetti alla carbonara, start by putting a saucepan with salted water on the stove to cook the pasta. In the meantime, remove the rind from the bacon and cut it first into slices 1 and then into strips about 1cm thick 2 3. The leftover rind can be reused to flavor other preparations.

Pour the pieces of guanciale into a non-stick pan 4 and brown for about 10 minutes over medium-high heat, be careful not to burn it otherwise it will release too strong an aroma. Meanwhile, plunge the spaghetti into boiling water 5 and cook them al dente. Meanwhile, pour the egg yolks into a bowl 6.

Add the Pecorino 7 and season with black pepper 8. Mix everything with a hand whisk 9until you get a smooth cream.

Meanwhile, the guanciale will be cooked 10; turn off the heat and using a ladle remove it from the pan, leaving the cooking liquid inside the pan itself 11. Transfer the guanciale to a bowl and set aside. Pour a ladle of water from the pasta into the pan 12together with the bacon fat.

Drain the pasta al dente directly into the pan with the cooking liquid 13. Skip it briefly to flavor it 14. Remove from the heat and pour the egg and Pecorino mixture into the pan. Stir quickly to mix 15.

To make it creamy, if necessary, you can add a little cooking water from the pasta. Add the bacon 16stir one last time 17 and serve the spaghetti alla carbonara immediately, adding more pecorino on the surface and a pinch of black pepper 18.

The guanciale must not be browned too much, otherwise it could release a bitter taste. It is also good to add the guanciale only at the end to maintain its crunchiness.

To avoid the omelette effect, it is important to add the yolk mixture only when the heat is off. Creaming is an important step, you have to mix until the cream has thickened. And you can adjust the consistency by adding pasta cooking water.

You can use half a dose of Pecorino and half a dose of Parmesan for a more delicate version.

For this recipe, we recommend trying Rummo Spaghetti n° 3.