Posted on

Pizzoccheri alla valtellinese recipe – GialloZafferano’s recipe

Pizzoccheri At Valtellinese

Podcast recipe

Duration 3:55 – Steps 10

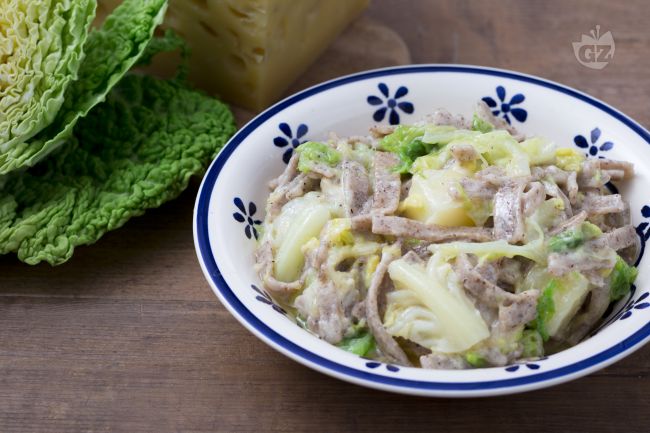
There are genuine and hearty dishes that can warm your stomach and heart, especially at high altitudes! Like the pizzoccheri alla valtellinese, a first course to be tried in particular in the small town of Teglio. However, be wary of imitations: although it is a dish of humble origins, pizzoccheri are a dish whose goodness does not derive only from the processing of the ingredients but also from the choice of the same: buckwheat flour stone ground, cabbage from the garden, malga butter are some of the must-haves to leave your guests truly amazed. Even in Giallozafferano we entrusted the preparation of pizzoccheri to a true Valtellina chef, Alessandro Negrini, an expert on this rustic dish from an early age, when his grandmother prepared them. Following in the footsteps of tradition, you can make this rich and delicious dish, to be prepared in summer and winter, starting from the very processing of pizzoccheri, a format of pasta similar to noodles but shorter, made from buckwheat flour, type 0 flour and water. To discover all the authentic taste of this first course, follow the steps and suggestions for cooking and sharing a fabulous plate of warm and gooey pizzoccheri!

Discover the other typical dishes of Valtellina, or their delicious reinterpretations:


Read the recipe in English

To prepare the Pizzoccheri, start by pouring the 0 flour and buckwheat flour into a bowl in the indicated doses 1mix the two flours well 2 and add the water at a temperature of 50° 3. This will make the starches in the buckwheat mix more easily.

Start working the ingredients by hand in the bowl 4transfer everything to a lightly floured pastry board with buckwheat flour 5 and knead the dough vigorously 6. This work phase is crucial: the dough must be handled with care to obtain the most elastic consistency possible.

Form a ball 7; the texture should be silky, not too soft. Flatten the ball of dough and sprinkle with a little buckwheat flour 8 and start rolling out the dough with a rolling pin; you will have to obtain a disc of about 2-3 mm thick 9.

Now, trim the edges 10 to even out the disc obtained, in order to obtain a rectangle, lightly sprinkle the surface with more buckwheat flour 11 and cut with a sharp knife into strips about 7 cm wide 12.

Layer 3 strips on top of each other 13 if necessary, sprinkle with a little buckwheat flour; with this method it will be faster to obtain the pizzoccheri in a precise manner, by cutting the overlapping strips into slices with a thickness of about 0.5-1 cm 14. Set aside the first pizzoccheri obtained, then continue in the same way for the rest of the dough 15. Previously discarded clippings can be used to make delicious potato soup!

You can start dedicating yourself to the seasoning. Put a pan with 6 liters of water on the fire; meanwhile clean the cabbage, peel it (with the outer leaves you can make a soup), cut it in half, then into slices 16remove the leathery part 17 and cut the cabbage into slices 18.

Now move on to the potatoes: peel them and cut them into thick slices, then into rather large pieces; it will be sufficient to try to make pieces of uniform size 19 so that cooking is homogeneous. When the water boils, add 60 g of salt (10 g per litre). Put the potatoes to boil on their own for about 2 minutes 20. Meanwhile, thinly slice the Latteria cheese (it is preferable to use it at room temperature) 21.

After two minutes of cooking the potatoes, add the cabbage 22; it is very important that the vegetables cook in the water in which the pizzoccheri will cook because it is part of a balance of substances which will then end up on the plate, both nutritional and digestive. After about 4 minutes you can pour half the dose of pizzoccheri by distributing them slowly in the pan 24;

with the help of the handle of a wooden spoon, turn them gently 25, to prevent them from sticking, then add the remaining ones slowly, always in rain. Stir for a few more seconds, then while the pizzoccheri are cooking (they should cook for about 4 minutes). Cut the poached garlic cloves in half 26 then pour the butter into a pan and let it melt together with the garlic cloves 27;

the butter will have to melt and be flavored with the garlic 28 and you will have to let it go on medium-low heat until you get a hazelnut color. In the meantime, prepare a large and low pan where you will then go to drain and season the pizzoccheri once ready. You will have to heat this empty pan by balancing it on the pan with the pizzoccheri cooking water 29; this will allow the Latteria cheese to melt in a homogeneous and controlled way. Then lower the heat under the pizzoccheri pot without turning it off. Using a slotted spoon, start draining the pizzoccheri very well 30

so as not to transfer water into the pan you have heated and create a first layer on the bottom of the pan 31. Without ever mixing in these phases, now spread a layer of Latteria cheese 32, continue with another layer of pizzoccheri; repeat the step of the Latteria cheese again and continue until you finish with the last layer of pizzoccheri and cheese. Flavor with the grated Grana 33

and at this point proceed as the Valtellina grandmothers do: place the pan with the pizzoccheri on top of the one with the still hot cooking water, just to keep the heat 34. Cover with a tea towel 35: in this way the heat of the pizzoccheri, cabbage and potatoes will help the Latteria cheese to melt. In the meantime, raise the heat under the pan in which you melted the butter with the garlic, so as to obtain the hazelnut color as anticipated. This will add aromas to the dish, without affecting digestibility. Then pour the hot butter over the pizzoccheri 36you will notice that the cheese has already melted;

remove the garlic cloves 37 and only now mix the pizzoccheri delicately and without exaggerating 38; plated 39 and taste piping hot and gooey pizzoccheri!

You can keep the pizzoccheri dough in the fridge for a maximum of 12-24 hours, wrapped in transparent film.

Freezing is not recommended.

It is advisable to consume pizzoccheri cooked piping hot and it is not advisable to store them.

When you work the pizzoccheri on the pastry board you will have to handle them for at least 15-20 minutes to favor the fermentation with the warmth of your hands.

If you prefer or are unable to find Latteria cheese, you can use Casera or a semi-fat cheese.

There are variants: in the Sondrio area you might happen to taste pizzoccheri seasoned with sage, while in the Upper Valley there are versions with the addition of onion. Or you can taste variations with the “pestada”, a mixture of aromatic herbs and pepper.

Measurements are important: the pizzoccheri should have a width of 0.5-1 cm and a length of 5-7 cm.

The tradition plans to consume the pizzoccheri on Friday for lunch, because traditionally Friday is lean day.

Buckwheat flour it is so called because it was brought to Italy by the Moors or due to its typical dark color which recalled that of the Saracens. Buckwheat is improperly defined as a cereal; in reality it is not a Graminacea and is part of the Polygonaceae, perennial plants, shrubs and herbaceous plants. It is therefore gluten-free, resistant to cold climates and attacks by parasites.

In winter pizzoccheri are seasoned with cabbage, in summer with chard or green beans depending on the families and areas.

If you order pizzoccheri in a restaurant and eating them you feel a “tingling” in the throat, it is a sign that the flour is not pure but the “chaff” is present, i.e. the external part that is lost during threshing. On the other hand, however, the chaff is not completely discarded in the production process, because it is a very valid natural element for stuffing pillows, especially the ergonomic ones and used for those suffering from neck pain or nighttime migraines.

Posted on

Roman Gnocchi Recipe – GialloZafferano’s Recipe

gnocchi alla Romana

Thursday gnocchi, Friday fish and Saturday tripe! The gnocchi I’m an ancient first course, prepared with the most varied flours and spread all over the world, even in different forms. As Roman tradition dictates, these represent the classic Thursday dish, probably placed in the middle of the week to compensate for the lightness of the following day’s meal… an arcane custom that is still carried out today by the most nostalgic Roman citizens. Today we have chosen to offer you a typical Lazio recipe: Roman gnocchi, made with the semolinaperfect for both sweet recipes, such as sweet semolinaor the Migliaccio that salty, like i canad them! Succulent discs of semolina characterized by a golden crust, made so fragrant thanks to the addition of butter and pecorino! Sure, in Rome, the right day to prepare them is Thursday but, once you try them, you’ll fall in love with them so much that every day will be the right one to bring these Roman-style gnocchi to the table! The secret? Serve them still steaming to find out!

Here are two other versions that you cannot give up:


Read the recipe in English

To prepare the Roman gnocchi, put the milk in a saucepan on the heat together with 30 g of butter, then add the salt 2 and a pinch of nutmeg. As soon as it starts to boil, pour in the semolina 3stirring vigorously with a whisk, to avoid the formation of lumps.

Cook the mixture over low heat for a few minutes, until it thickens 4. When the mixture begins to detach on the bottom, remove the pan from the heat and add the 2 egg yolks 5stirring this time with a wooden spoon 6.

Also add the Parmesan in several stages 7 and mix gradually, until everything is incorporated 8. At this point, pour half of the still hot dough onto a sheet of parchment paper 9.

Give it a cylindrical shape with your hands 10. In order not to burn yourself too much, you can run your hands under cold water. Once you have a uniform cylinder, wrap it in parchment paper 11. Repeat the same operation for the second half of the dough kept aside and put the 2 rolls back 12 in the refrigerator for at least an hour.

Once cooled you will obtain a compact dough and with a knife you will be able to obtain perfect discs, about 1 cm thick 13. To make cutting easier, we recommend moistening the blade with water. Once you have obtained about 40 pieces, arrange them on a previously buttered pan 14 and sprinkle them with melted butter (about 70 g), but not hot 15.

Sprinkle the surface with Roman Pecorino 16 and cook in a preheated static oven at 200° for 20-25 minutes (if you use the convection oven at 180° for 15 minutes). Then activate the grill function and let them brown for 4-5 minutes. Once ready 17 serve your gnocchi alla romana piping hot 18!

To enhance the taste of the gnocchi even more, add a few sage leaves between one dumpling and another!

Semolina cannot be replaced with semolina, as one might think, because they are two different products. In fact, semolina is produced with a mix of cereals.

To obtain a uniform cylinder, the dough must be kneaded while it is hot.

Posted on

Salmon puff tree

Recipe description

L’ Salmon puff tree it is a tasty rustic pastry based on puff pastry stuffed with ricotta and salmon.

This delicious finger food is ideal for enriching your lunches, dinners or buffets Christmas as original as it is tasty, it will make a good impression on the festive table.

L’ Salmon puff tree it is a fun and tasty appetizer that accompanied with a glass of sparkling wine will be perfect to start your Christmas menus.

Prepare it with us.. follow the recipe.

Cocktails, aperitifs, tasty first courses, succulent second courses, scenographic desserts… you can find this and much more in the holiday recipes

Find out how to complete yours Christmas menu by consulting the section Christmas recipes by Chefsilvia. Happy holidays.

Salmon puff tree

Recipe ingredients

  • 2 rolls of puff pastry
  • 200 g of ricotta
  • 100 g of basil pesto
  • 100 g of sliced ​​smoked salmon
  • 1 egg
  • 2 tablespoons of sesame seeds
Posted on

Banana bread recipe – GialloZafferano’s recipe

Banana Bread

It’s breakfast time: coffee, freshly squeezed orange juice and… banana bread, which, together with Porridge, is one of the cornerstones of the Anglo-Saxon breakfast! A Sweet soft and delicious with banana pulp, flavored with cinnamon. This rich plumcake is also perfect for a snack or for a brunch, lightly heated in the oven and served with jam and peanut butter. The cooking aroma will spread throughout the kitchen and, once ready, slice after slice will disappear in a flash! Quick and simple to prepare, it’s an excellent idea to use those bananas that are often forgotten in the fruit basket, too ripe to be enjoyed pure. Try our version of banana bread, also in the variant light And coconut, and enrich it to taste with chocolate chips, walnuts or coarsely chopped hazelnuts. It will be even better!

If you love this fruit also try:


Read the recipe in English

To prepare the banana bread, start by peeling the bananas and cutting them into slices 1. Transfer the bananas to a bowl and drizzle them with lemon juice to prevent them from turning black 2then mash them with a fork until they are reduced to a puree 3.

In another bowl, put the butter cut into small pieces, soft but still plastic, together with the sugar 4. Work with an electric whisk until you obtain a homogeneous mixture, then pour in one egg at a time, so as to incorporate them better 5. Add the baking powder and a pinch of salt, always keeping the whisk in action 6.

At this point add the banana puree 7 and mix with a marisa to mix it with the mixture 8. Sift the flour directly into the bowl 9.

Also add the baking soda 10 and flavored with cinnamon 11then incorporate the powders mixing with the marisa 12.

Pour the mixture into a 22.5×8.5 cm loaf pan, previously greased and floured 13. Level the surface 14 and make an incision lengthwise with the blade of a knife dipped in melted butter 15.

Bake in a preheated static oven at 180° for about 60 minutes 16. After this time, check the cooking with a toothpick, then take it out of the oven and let the banana bread cool in the mould 17 before unmolding it and cutting it into slices 18!

Posted on

Grandma’s Cake Recipe – GialloZafferano’s Recipe

Grandmother's cake

Who remembers when in the restaurant, between the mid-eighties and the early nineties, the most awaited moment arrived, the dessert trolley? And between very high mountains of profiteroles, tempted by the tiramisu pan or tempted by the panna cotta… in the end, she often had the best: grandma’s cake! Maybe it’s because of her reassuring name, which tastes good and genuine, or because of its simplicity, but grandma’s cake is still a must today! A timeless classic, a perfect dessert for Sunday lunch that we want you to savor at its best, preparing a delicious one shortbread fragrant and a divine custard. There are at least two versions of the Torta della Nonna: an open one, which includes the base and the cream directly garnished with pine nuts and icing sugar, and a covered one, with a double layer of pastry and custard in the centre. We opted for the latter and… we hope that your choice of GialloZafferano’s roundup of desserts will occasionally also fall on this delicacy!

Don’t miss out on the irresistible variant with pistachio and the chocolate one, which takes the name of grandpa cakeor the version muffin or plum cakeperfect for breakfast!


Read the recipe in English

To make the grandmother’s cake, first prepare the custard: pour the egg yolks and sugar into a saucepan 1mix with the spatula and then add the flour 2. Mix again until you get a smooth and thick mixture 3.

Pour the milk into another saucepan, flavor with the grated lemon zest 4 put it on the fire. When it has reached the boil, first pour a small amount of milk on the egg mixture to dilute it, stirring with a spatula 5, then add it all and mix again. Transfer the saucepan to the heat and thicken the cream over medium heat, stirring constantly 6until it is thick and creamy.

Transfer the cream to a bowl 7 and place it over a larger bowl that you have previously filled with ice cubes 8: in this way it will cool down quickly without losing its color and consistency. If you don’t use it immediately for preparation, cover with cling film and transfer to the refrigerator 9.

In the meantime, prepare the pastry: put the flour and the cold butter cut into pieces in a mixer 10, then activate the blades for a few moments to obtain sandblasting. If you don’t have a mixer, you can “pinch” the butter with your fingertips to mix it well with the flour. Transfer the sandy mixture onto a pastry board and form a bowl in the centre, then pour in the sugar 11 and eggs 12.

Grate the zest of a lemon 13 and work the ingredients briefly, just long enough to compact them 14, and give the pastry the shape of a loaf. Flatten the dough slightly and wrap it in cling film 15then place in the fridge to harden for at least 30 minutes.

Once the pastry has cooled down, roll out the dough on a lightly floured work surface to a thickness of 2-3 mm 16; you can put the dough between two sheets of parchment paper to spread it out more easily. Grease and flour a tart mold with a diameter of 26 cm 17then roll up the pastry on the rolling pin and place it delicately inside the mould 18.

Press with your fingers to make the dough adhere well to the base and edges, then trim off the excess 19. Prick the base with the prongs of a fork 20 and stuffed with the now cold custard 21.

Knead the leftover pastry again and roll out the dough again to a thickness of 2-3 mm, then roll up the pastry disk on the rolling pin and unroll it on the mold to cover the cream 22. Press edges with fingers to seal 23 and pass over the rolling pin to remove the excess 24.

Brush the surface with a little egg white 25 and prick it with the prongs of a fork 26then sprinkle with pine nuts 27.

Are you ready to bake grandma’s cake 28: cook in a preheated static oven at 160° for 50 minutes on the bottom shelf, then raise the temperature to 180° and cook for another 10 minutes. If the surface gets too dark during cooking, you can cover it with aluminum foil. Once cooked, remove from the oven and leave to cool completely 29. Sprinkle with icing sugar and serve your delicious grandmother’s cake 30!

Keep grandma’s cake in the fridge for a couple of days.

If you prefer, you can prepare the pastry in advance, freeze it and defrost it as needed.

Even the custard can be prepared in advance: in this case it should be kept in the refrigerator covered with contact film until it is used.

Posted on

Sachertorte Recipe – GialloZafferano’s Recipe

Sacher cakes

Podcast recipe

Duration 4:33 – Steps 14

In 1832 in one of the most central hotels in Vienna, which has now become a “sacred” temple of pastry, something special happened that marked the history of Austrian cuisine. Franz Sacher, a 16-year-old apprentice pastry chef and chocolate lover, created the Sachertorte which today is certainly one of the most famous and appreciated chocolate cakes in the world. The story tells that the young Franz, who was replacing a sick chef that day, was preparing a dessert for the dinner of the greedy Prince Von Mitternich Winnesburg and, after having thought for a long time, he decided to combine simple and traditional elements such as chocolate and jam to create a delicate and tasty dessert. Apparently the dessert was a great success and from that day on the young Franz Sacher had to work hard to prepare this cake that also took his name: the Sachertorte. Since then the fame of the Sachertorte has spread all over the world and even if thousands of people continue to prepare it, the original recipe is jealously guarded in Vienna and is not revealed to anyone. We offer you the version made by Ernst Knam, a real guarantee when it comes to chocolate!

Discover also another Austrian sweet: the linzer cakes or the version Spoon Sacher!

To prepare the Sachertorte, first transfer the chocolate into small pieces in a bowl 1 and melt it in a water bath 2. If you prefer, you can melt the chocolate in the microwave by activating it a few seconds at a time and stirring at each interruption so as not to burn the chocolate. In the meantime, place the soft butter and icing sugar in the bowl of a planetary mixer 3

and a pinch of salt 4. Also add the seeds of the vanilla pod 5 and start working the mixture with the whisk 6 until you get a creamy consistency.

Then pour in the lightly beaten egg yolks in two batches 7 and continue to whip the butter 8; it will take about 8-10 minutes. The important thing is that the mixture of icing sugar, egg yolks and butter is well whipped so that the dough develops well during cooking. Now, make sure that the chocolate you have melted has a temperature between 45 and 55°; it is preferable to use a thermometer to measure it: if it were to be too high, in fact, it would risk melting the butter, vice versa it would risk compacting the mixture too much. Now add the chocolate to the butter and egg yolks mixture 9 and keep mixing

until you get a uniform mixture 10. Then pour the egg whites into the bowl of a planetary mixer and start beating them at high speed 11. As soon as they are white and frothy (when they start to “rise”) slowly add the granulated sugar, always a little at a time 12; it is important to wait for the egg whites to be lightly whipped before adding the sugar, otherwise the egg white will become too heavy and will take much more effort to whip.

The egg whites should not be whipped until stiff, but you will have to stop a few moments before 13 otherwise when you go to insert them in the dough they will continue to assemble and the cake, once cooked, would risk collapsing. At this point add the egg whites twice into the yolks and chocolate mixture 14 and mix with a spatula 15 or with a whisk.

Then add the already sifted flour 16 and mix from top to bottom with a spatula 17until a smooth and uniform mixture is obtained 18.

Grease and flour an 18 cm diameter mold, then pour the mixture inside, level the surface 19 and cook in a preheated static oven at 170° for 35-40 minutes. After this time, check the cooking with a toothpick, then take the cake out of the oven 20; don’t worry if the cake is cracked on the surface. Let the cake cool completely, before turning it out of the mold by turning it upside down. Then cut the cake into two discs using a long serrated knife 21.

Arrange about half the apricot jam inside 22 and spread it with a spatula over the entire surface 23. Cover with the second disc 24

add more jam on the surface 25 and using a spatula spread it everywhere to create a veil, even on the edges of the cake 26; in this way the final effect will be more shiny. Transfer the cake to a rack 27 and prepare the ganache.

Place the cream in a saucepan and bring it to the boil 28; as soon as it starts to boil, turn off the heat and add the chocolate 29. Mix with a whisk until the chocolate is completely melted and well blended 30.

Then transfer the ganache into a bowl 31 and use it to glaze the cake 32using a spatula and tapping it delicately on the surface in order to cover both the surface and the edges and smooth it at the same time 33. To be smooth and shiny, the ganache must have a temperature of about 40°.

At this point, put it in the fridge to harden (at +4°) for about 20 minutes 34. Then transfer the sacher torte onto a serving plate 35 and serve each slice alone or with semi-whipped cream without sugar 36.

The chocolate must have a cocoa percentage of 60%; if you have a chocolate with a higher percentage you will get a drier cake.

In the ganache, on the other hand, if you have a chocolate with a higher percentage of chocolate, it is necessary to increase the dose of cream, on the contrary it will be necessary to reduce it.

We recommend using a static oven for cooking the cake, otherwise it will be drier. To reduce this “side effect” you can place a bowl of water at the base of the oven to promote humidity.

For a gluten-free version, replace the 00 flour with the same dose of a mix of gluten-free flours.

To obtain a more humid effect it is not necessary to wet the cake but it is sufficient to increase the amount of jam inside. Conversely, for a drier result you can fill only with a veil of jam.

Posted on

Brownies

After adding the melted chocolate you can flavor the brownie dough with cinnamon, ginger or tonka beans.

Hazelnuts can be substituted for other roasted nuts such as almonds, walnuts, pecans or peanuts!

For an even more intense flavor you can use 65-70% dark chocolate.

Try replacing some of the butter (up to 50%) with coconut oil for a fruitier aroma!

Posted on

Roast duck

Recipe description

L’ Roast duck it is an appetizing second course perfect to amaze your guests during the next ones Christmas festivities,

Duck meat is much appreciated in the kitchen and today I offer it roasted flavored with tasty slices of bacon which, in addition to enhancing its flavor, preserve its softness during cooking in the oven.

This roast is a perfect dish for the dinner table Christmas being a valid alternative to the classic roast chicken.

For others Christmas recipes consult the section Christmas recipes by Chefsilvia. Enjoy the reading.

Roast duck

Recipe ingredients

  • 1 cleaned duck of about 1 kg and 200 gr
  • 150 g of sliced ​​bacon
  • 3 spoons of extra virgin olive oil
  • Salt and Pepper To Taste
  • 1 clove of garlic
  • 2 onions
  • 3-4 sage leaves
  • 1/2 glass of white wine
Posted on

Spaghetti cheese and pepper

Spaghetti cheese and pepper

“Yes, life is a mozzico, here you mozzico well”. This is one of the typical phrases that introduce the menus in Roman trattorias or fraschette. But the Bacon and egg and theTomato and bacon, like spaghetti cacio e pepe, have now become symbolic dishes of Italy, made with DOP ingredients linked to the traditions of the territories in which they were born. An excellence that from the “checkered tablecloths” arrives in the kitchens of the great Chefs, as in the case of spaghetti with cheese, pepper and sea urchins. We too want to pay homage to one of the symbols of good and genuine eating, showing you how to make a perfect cacio e pepe! The chemical combination of water and Pecorino proteins, essential for obtaining a cream without lumps, the whole peppercorns crushed at the moment and toasted in a pan to release all their pungent aroma, the slowly creamed pasta to absorb all the flavor of the Roman Pecorino … and above all, prepare and enjoy: another rule for enjoying spaghetti cacio e pepe at its best!

Find out how many first dishes can be made inspired by this great classic:


Read the recipe in English

To prepare the cacio e pepe spaghetti, first put a pot on the stove with the water to cook the pasta: fill it with about half of the water you usually use, in this way it will be richer in starch. In the meantime, grate the Roman Pecorino 1 and transfer almost all of it into a bowl, keeping some aside for plating. When the water has come to a boil, add salt and add the spaghetti 2. Meanwhile pound the peppercorns with a meat mallet (or use a grinder leaving it rather slow in order to have even larger pieces of pepper) 3.

Pour the pepper into a large non-stick pan 4 and toast it over low heat, stirring with a wooden spoon. Deglaze with a couple of ladles of the pasta cooking water 5. Keep stirring over low heat 6.

Drain the spaghetti 2-3 minutes before the time indicated on the package and transfer them to the pan, taking care to conserve the cooking water 7. Finish cooking the spaghetti in the pan, risottandoli, then adding hot water as needed 8 and stirring constantly with tongs 9. Wait until the bottom of the pan is almost dry before adding more water.

You can prepare the Pecorino cream (do not start earlier because it would tend to thicken or be too cold compared to the temperature of the pasta): pour a ladle of hot cooking water into the bowl with the grated Pecorino 10then mix vigorously with a hand whisk 11. The consistency you’ll need to get is more pasty than creamy, don’t worry if it’s very dry. If, once the cream is ready, the pasta is not ready for creaming, place the bowl briefly on the pan with the hot water, continuing to mix with the whisk, so as to have the cream at a temperature similar to that of the pasta. 12.

When the spaghetti is cooked, turn off the heat and add the Pecorino cream 13stirring constantly with the tongs 14 For the ideal creaminess, adjust by adding more Pecorino or a little cooking water as needed. Serve your spaghetti cacio e pepe by sprinkling with the remaining grated Pecorino and more freshly ground pepper to taste 15!

It is important that the pasta cooking water is rich in starch because it will help you to obtain a creamy sauce without lumps.

If you prefer to test your skill in making cacio e pepe, the advice is to make half the dose so that it is easier to manage the ingredients of the cream cheese.

Short pasta lovers can use half sleeves or rigatoni instead of spaghetti! There is also a tasty version with pici, typical of Tuscany.

A gem? If you want to slightly “degrease” the dish, you can grate a little lemon zest into the Pecorino cream: purists won’t want it.

For this recipe, we recommend trying Rummo Spaghetti n° 3.

Posted on

Muffin with chocolate drops

Muffin with chocolate drops

English and American cuisine boast many typical recipes, sweets and salty, like the Porridge oi pancakes, which over time have conquered us too with their irresistible goodness. This is the case of muffins with chocolate chips: simple and very soft cakes that will captivate your sense of smell while you are churning them out with their delicious scent. THE muffin can be customized as you prefer but the chocolate, which has seduced the greatest writers, from Goldoni to Leopardi, is certainly the most popular choice. There are those who are always looking for lightness and prefer those without butter. So if, after preparing them, your guests will stock up on these delicious chocolate chip muffins, don’t be surprised… on the contrary, we advise you to keep at least one aside for yourself or prepare a pan of fluffy lemon muffins to put them in difficulty whether to choose one or the other…
And if you don’t have a pan to make muffins, don’t despair, you can make ours too chocolate chip cake!

To prepare the muffins with chocolate chips, the butter should be left out of the fridge for at least 1 hour to soften it. Add the sugar to the soft butter 1work with electric whips until you get a frothy and creamy compound 2. Then cut a vanilla pod and scrape out the seeds using the back of a knife 3

Pour the latter into the bowl with the butter and sugar 4. Activate the whisk again and add the eggs, also at room temperature, one at a time 5 in this way the ingredients will not untie 6.

Now sift the flour 7the baking powder 8 and bicarbonate 9 directly into the bowl with the mixture.

Also add the pinch of salt and operate the whisk again to incorporate the powders 10. You will notice that the dough will become more consistent so dilute it with the milk at room temperature poured in slowly 11. At this point the compound will be soft and compact 12.

Add 80 g of chocolate chips 13 and mix with a spatula to incorporate them, then transfer the mixture into a disposable sac-a-poche without a nozzle 14 in this way you can do a cleaner job otherwise use a spoon. Arrange the paper cups in a muffin pan and fill them 2/3 full, leaving less than a centimeter from the surface 15. Each muffin should weigh approximately 70 g.

Pour the remaining chocolate chips onto the cupcakes 16 and cook in a preheated oven at 180° for 18-20 minutes in static mode 17. At this point your chocolate chip muffins are ready to be enjoyed 18.