Posted on

Cantonese rice

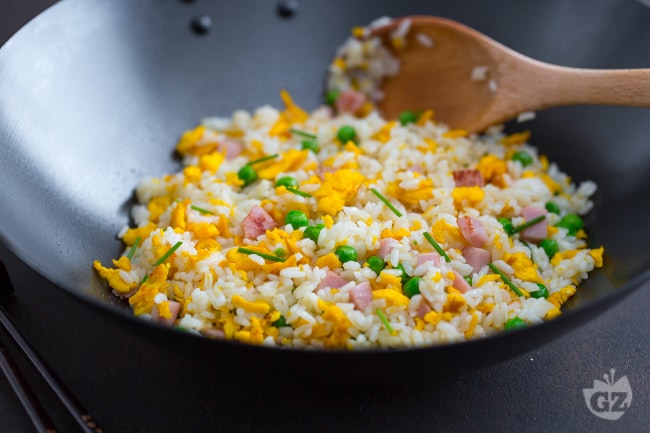
The wok it is perfect for mixing the ingredients with rice but if you don’t have it you can use a normal non-stick pan.

The currant rice (Original) is the ideal one, it can be replaced by basmati rice, but pay attention to the cooking times.

It is advisable to use a glass lid for cooking rice: this way it will be easier to see when the water comes to a boil.

As an alternative to rice wine, table wine can be used, even if the taste will be a little different.

You can use peanut or sunflower oil, whichever you prefer.

If possible, buy yellow-fleshed eggs: they will give a much more intense color to the dish!

You can vary the Cantonese rice recipe by replacing, for example, the cooked ham with shrimp or with tofu or tempeh for a vegetarian version.

If you want to add soy sauce, do it when the ingredients are sautéed, never raw!

Posted on

Cake Recipe 7 Jars – GialloZafferano’s Recipe

Cake 7 Jars

Podcast recipe

Duration 2:27 – Steps 8

How many times have you happened to be on vacation and not have a scale to make a good dessert? With the recipe for the 7 jar cake, in any kitchen you will be able to prepare a healthy and nutritious breakfast for the whole family! This tall, soft dessert takes its name from the 125 ml pot of yogurt that is used as the unit of measurement for all the other ingredients. A clever idea that we have also experimented with in other versions such as the cake 7 savory jars And 7 jar cake with zucchini. A yogurt cake homemade for everyone that is made without butter, but only with the use of seed oil which makes the dessert even softer! The 7 jars cake is good natural but it is also perfect to cut and fill with cream or jam for a mouth-watering snack! Prepare it too, the scent alone will inebriate your senses! And if you love simple desserts with yogurt, try some very easy ones too Yogurt biscuits or a soft one cake without butter!

To prepare the 7 jars cake, take a 125 ml jar of full-fat yoghurt (at room temperature) and pour it into a bowl 1then add two jars of sugar 2 and with a hand mixer start working them together 3until you get a smooth cream.

At this point, break the eggs and separate the whites and yolks into two separate bowls 4then by activating the mixer again, add the yolks to the yogurt and sugar mixture 5 until you incorporate them 6.

Still with the beater running, slowly add the oil 7. Once it is well blended, place a sieve directly on the bowl 8pour the two jars of flour 9,

the jar of starch 10 and finally the sachet of baking powder 11. Sift everything and always using the mixer at low speed 12 incorporate the powders,

until you get a smooth and uniform mixture 15. At this point, take the egg whites and whip them until stiff (14-15).

Add them to your mixture in two or three times: start by adding a small amount of egg whites and mix by stirring vigorously without fear of deflating the mixture 16then incorporate the rest of the egg whites and mix gently with rotating movements from bottom to top, to avoid disassembling the compound 17. Once your cake dough is ready, butter and flour a 24 cm diameter round mold; then pour the mixture inside 18.

At this point 19 cook the 7-jar cake in a preheated static oven at 180° for 45 minutes; if the cake should darken on the surface, cover it with aluminum foil during the last 10 minutes of cooking. You can check the cooking by doing the toothpick test; once cooked, take it out of the oven 20 and let it cool before turning it out of the mold and serving it 21.

Posted on

Gnocchi alla Sorrentina Recipe – GialloZafferano’s Recipe

Gnocchi Sorrento style

One of the first dishes Campania’s best known in Italy and abroad… are the gnocchi alla sorrentina, truly prepared in all the restaurants of the world! What makes this dish of gnocchi so loved is the mix of Mediterranean flavors, genuine and simple. Making gnocchi by hand will bring to mind the Sundays spent at grandma’s house to understand all the secrets hidden behind the perfect consistency of those little gems of potatoes and flour. The gnocchi alla sorrentina are then wrapped in a creamy tomato and basil sauce, flavored with mozzarella and grated cheese… precisely the ingredients that will make the gnocchi even more delicious, creating a stringy effect after the very short passage in the oven. For variety you could also try making the zucchini dumplings, as an alternative to the classic dough with potatoes. Did we make your mouth water? Prepare with us the gnocchi alla sorrentina!

For an equally streamlined version, discover the recipe for the parmesan gnocchi or the variants with pasta or zuchinis!


Read the recipe in English

To prepare the gnocchi alla sorrentina, start with the potatoes to make the gnocchi: wash them under running water to remove any soil, then pour them into a large saucepan, add the water 1 and cook the potatoes for about 30-40 minutes (the time may vary depending on the size, do the test with the tines of a fork to understand the degree of cooking; if you want to reduce the cooking time you can use a pressure cooker). Dedicate yourself to the sauce: pour a drizzle of oil, a whole peeled garlic clove and the tomato puree into a pan 2salt to taste 3.

Season with the basil leaves, then cover with the lid 4 and cook over medium-low heat for about 30 minutes. When the potatoes are ready, drain them well. Then sift the flour on a pastry board and create the classic fountain 5. Mash the still hot potatoes in the center of the flour fountain with the special potato masher 6 or peel and mash them.

Pour the egg over the potatoes 7 and the salt 8then start kneading 9: this operation must be done rather quickly.

Just compacting will suffice 10 and give a homogeneous consistency to the dough, which must be soft but not sticky (and not too tenacious) 11. Cover the dough with a dry, clean tea towel. Boil the water for cooking the gnocchi in a large saucepan and add salt to the boil; In the meantime, take a portion of the dough by hand, keeping the rest covered 12.

Make bigoli about 2-3 cm thick 13. Sprinkle with a little semolina and make the gnocchi out of each loaf using a tarot 14. To give the classic streak, gently drag them onto a riganocchi 15 or on the tines of a fork.

As you prepare them, you can arrange the gnocchi on a tray lined with a clean cloth and lightly sprinkled with semolina 16. Once the gnocchi are ready, remove the garlic from the sauce 17 and pour almost all of it into a very large bowl 18.

Boil the gnocchi by pouring them into the pan at least 2-3 times 19they will have to cook for a very few moments, taking care that the water in the pan simmers and does not boil violently to avoid damaging them: as soon as they come to the surface, drain the gnocchi with the help of a slotted spoon and gradually drop them into the bowl where you poured the gravy 20. Gently mix with a spoon. In a baking dish, pour the remaining sauce on the bottom, then drizzle with a drizzle of oil 21.

Pour a first layer of gnocchi 22 23. Dress with a layer of diced or frayed mozzarella and a sprinkling of Parmesan 24.

Then continue with another layer of gnocchi 25the remaining mozzarella and Parmigiano Reggiano DOP 26. Bake your Sorrento gnocchi in a preheated static oven at 250° in grill mode for 5 minutes. Serve them piping hot and steaming hot 27!

Posted on

Chiffon cake recipe – GialloZafferano’s recipe

Chiffon cake

Do you know the lightness of a cloud? Chiffon cake will give you just this sensation: a soft dough, extremely soft and delicate to melt in your mouth. The feature of this particular Sweet American is precisely its irresistible lightness and softness. It can be enjoyed simple, as in this version flavored with vanilla and lemon and sprinkled only with icing sugar. But the chiffon cake is also the ideal base to make for cakes of all kinds, stuffed as you prefer or covered with icing.
The maximum softness is due to the addition of the cream of tartar to the whipped egg whites and to the chiffon cake mold itself which allows the passage of air and the homogeneous cooling of the cake. Alone or enriched with velvety creams, chiffon cake is a truly heavenly experience for the palate!

Here are other desserts similar to this one to try:


Read the recipe in English

To prepare the chiffon cake, start sifting the flour into a bowl 1. Sift the yeast as well 2 and add the extra fine sugar 3.

Also add the salt 4 and mix with a spoon to mix the powders 5. Take the eggs and separate the yolks and whites into two different bowls 6. Put the egg whites back in the fridge.

Add the water at room temperature to the yolks 7 and seed oil 8. Also add the grated zest of a lemon 9.

Cut a vanilla bean to extract the seeds with the tip of a small knife and add them to the yolk mixture 8. Beat the mixture with a whisk until you obtain a homogeneous cream, there will be no need to whip it. Then pour it into the bowls with the powders 11. Mix with a whisk until the mixture is smooth and free of lumps 12then keep aside.

Take the cold egg whites and pour them into the bowl of a stand mixer 13 (if you don’t have a planetary mixer you can use an electric mixer), then activate the whisk and start beating the egg whites. When they have become white and frothy, pour the cream of tartar by sieving it inside 14 and keep going the whips for a few minutes. Once the egg whites are well whipped, transfer a part of them to the mixture kept aside and mix quickly with a spatula to dilute the mixture. Then add the remaining egg whites a little at a time, always mixing with a spatula 15 from top to bottom so as not to disassemble them.

Now that the cake batter is ready 16pour it delicately into the chiffon cake mold: we used a mold with a 21 cm diameter base, 25 cm diameter on the surface and 10 cm in height (it should not be buttered and floured) 17trying to distribute it evenly 18.

Then bake the chiffon cake in a preheated static oven at 160° for about 60 minutes (for a fan oven at 150° for 45-50 minutes), positioning the cake in the lower part of the oven. Always do the toothpick test before taking the cake out of the oven to check if it is done, and only when it comes out clean do you take the chiffon cake out of the oven 19. Wait 5-10 minutes and quickly turn the mold upside down, using a plate to help you 20. Place the mold on the special feet, so that the cake gets air, cools down and detaches itself from the edges. When the cake is completely cold, remove the bottom of the mold with the help of a small knife 21.

This operation must be done quickly to prevent a part of the cake from sticking and “tearing” under the weight of the cake. Then lift the base 22sprinkle with icing sugar 23 and serve 24.

• Use extra-fine sugar, caster sugar may not dissolve properly and you may find grains of sugar in the dessert.

• It is important that the egg whites are cold from the refrigerator. Before whipping them you can cool the bowl and the whisks in the fridge for 30 minutes.

• Instead of cream of tartar you can use the same amount of baking powder and add a pinch of baking soda.

• Once the cake is out of the oven, wait 5-10 minutes before turning it over, otherwise it could break.

• The mold should be buttered only if it is new and it is the first time you use it. Otherwise it shouldn’t be buttered at all

• for this dessert you can also use a donut mold, but the chiffon mold, with these feet, is really made to keep the cake raised while it cools.

Posted on

Meatballs with gravy

Meatballs with gravy

Meatballs with sauce are one of the most classic recipes, so loved by everyone, but especially by the little ones. Ways to prepare meatballs there are so many… every grandmother keeps her recipe secretly, but today we want to show you how we prepare them!
Minced meat and sausage, mixed together will give a unique flavor, while bread and cheese as well as accentuating the taste, will give the right softness. Round, tasty and succulent, our meatballs are browned and then cooked in the sauce, in this way they will not fall apart and will keep their shape intact
Meatballs with gravy is a recipe from the heart, which takes us back to a particular moment. Maybe our meatballs won’t live up to your grandmothers, red or blankbut we hope that their taste, even if only in part, takes you back to one of the family Sunday lunches.
We recommend that you don’t forget to serve the meatballs with good homemade bread for the final “slipper”, an essential custom for this dish!

Here are some more meatballs to try:


Read the recipe in English

To prepare the meatballs with sauce, start with the dough: cut the breadcrumbs into pieces 1 and pour it into a mixer fitted with blades 2. Chop everything until the crumbs are reduced to crumbs 3.

Take the sausages, gently cut them lengthwise 4 and finally remove the casing 5. With the blade of a knife or a fork, mash the meat 6.

Put the sausage and minced meat into a large bowl 7. Add the oregano 7a pinch of grated nutmeg 8 and the chopped parsley 9.

Finally, add the grated Parmesan 10 and the crumb that you minced previously. Also add the egg 11 and start kneading with your hands 12.

Season with salt and pepper 13then continue to knead until you get a homogeneous mixture 14. With the mixture obtained, form spheres weighing 20 grams each 15taking a piece of dough and mixing it with both hands: with our doses you will have to obtain 24 meatballs.

As soon as all the meatballs are ready, heat the oil in a non-stick pan and, when the oil is hot, place the meatballs 16letting them cook on both sides for a couple of minutes 17. Pour in the tomato pulp 18.

Also add the water 19, season with salt, flavor with pepper and continue cooking by lowering the heat for 15-20 minutes. Once ready 20flavored with dried oregano and you can enjoy your still steaming meatballs with sauce 21!

Posted on

Lamb, cheese and eggs

Recipe description

Lamb cacio e ova, also called casce e ova, is a second dish based on lamb meat typical of Abruzzo cuisine usually prepared on the day of Easter

Cacio e ova lamb is nothing more than a lamb stew slowly cooked with oil, garlic and rosemary and flavored at the end of the preparation with beaten eggs, lemon juice and cheese, a rustic but very tasty dish perfect for your Easter menu

For others Easter dishes consult the section Easter and Easter Monday recipes by Chefsilvia. Enjoy the reading.

Lamb, cheese and eggs

Recipe ingredients

  • 1 kg of lamb meat (shoulder or leg)
  • 4 eggs
  • the juice of ½ lemon
  • 100 g of grated pecorino
  • Salt and Pepper To Taste
  • ½ glass of white wine
  • 2 cloves of garlic
  • 1 sprig of rosemary
  • 3 spoons of extra virgin olive oil
Posted on

Hummus Recipe – The GialloZafferano Recipe

For the preparation of both hummus and tahina you can choose whether to use the blender or the mortar: in the second case you will obtain a less smooth consistency but the nutritional principles are better preserved.

If you use the mortar to make the tahina, you can continue with the recipe by mixing the pre-cooked chickpeas and the rest of the ingredients gradually with the pestle.

If you wish, you can customize the basic hummus recipe by adding other ingredients to taste: a pinch of curry or turmeric for example, which will give the cream a more intense colour, or mint, coriander, ginger powder, cumin or chilli pepper!

You can also enrich the basic recipe with other ingredients to create delicious variations: discover the recipe of theavocado hummusofpepper hummus or ofbeetroot hummus for example! Or substitute chickpeas to make a tasty one lentil hummus.

You can use leftover tahini to make a delicious Lebanese turmeric dessert, lo sfuf! Or you can make the babaganousha typical aubergine cream of Middle Eastern origin, to try also in the version of Italian babaganoush!

Posted on

Spaghetti with clams

Spaghetti with clams

Directly from the Campania tradition, spaghetti with clams is definitely one of the most important Italian cuisine dishes and one of the most loved among the fish first courses. A very simple recipe with a wonderful taste of the sea, which hides a few little secrets for a perfect result. Meaty clams, a sprinkling of parsley and the delicious cream that is naturally created with the starch in the pasta make spaghetti alle vongole a real delicacy. It is the perfect course for any occasion, from dinner with friends to Sunday lunch to dinner Christmas you hate New Year’s!

Also discover these appetizing variations:


Read the recipe in English

To prepare spaghetti with clams, start with cleaning. Make sure there are no broken or empty shells, they will be discarded. Then beat them against the sink, or possibly on a cutting board 1. This operation is important to verify that there is no sand inside: healthy bivalves will remain closed, while those full of sand will open. Then place the clams in a bowl 2 and rinse them. Add the coarse salt 3.

Leave the clams to soak for 2-3 hours 4. After this time the clams will have purged any residual sand, drain and rinse them 5. In a saucepan, heat a little oil. Then add a clove of garlic 5 and let it brown.

Then dip the clams into the hot pan 7. Close with the lid 8 and let it cook for a few minutes on a high flame. The clams will open with the heat, so shake the pan occasionally until they are fully open. Meanwhile, finely chop the parsley 9.

As soon as all the clams are open 10 turn off the heat immediately, otherwise the clams will cook too much. Cook the spaghetti in plenty of lightly salted water 11for half the cooking time indicated on the package. Meanwhile filter the clams 12placing a bowl underneath and remembering to remove the garlic.

In this way you will collect the cooking water from the clams in the bowl 13. Transfer it to the pan where you cooked the clams 14 and as soon as the spaghetti is ready, drain it, keeping the cooking water aside. Transfer them to the pan with the sauce 15.

Add a ladle of cooking water 16season with pepper 17 and finish cooking the spaghetti, adding more water as needed. When they are ready, add the clams 18.

Also add the parsley 19skip briefly 20 and serve your spaghetti with clams immediately 21.

Here are some tips that might come in handy:

1) do not add too much salt to the pasta cooking water, the clams are already tasty enough

2) use very fresh clams

3) for a spicy touch, add a chopped chilli pepper to the garlic sauce

4) you can blend the clams with white wine

5) if you prefer, you can shell part of the clams.

You can also finish the dish by adding some botargo or lemon zest.

In Campania there is no Christmas Eve menu without spaghetti with clams, an inevitable course like theside salad and some cod pizzas!

For this recipe, we recommend trying Rummo Spaghetti n° 3.

Posted on

Saffron Risotto Recipe – GialloZafferano’s Recipe

Saffron risotto

Podcast recipe

Duration 2:36 – Steps 6

Saffron is an ancient spice, already known in the time of the Egyptians. In the beginning it was only used to dye fabrics and make perfumes and ointments, once its amazing culinary properties were discovered, it became a valuable ingredient with which to make tasty dishes with golden hues such as saffron risotto, also known as saffron risotto in which the pistils or the are used pasta. This first course, in its essentiality, best enhances the aromatic qualities of saffron but not only, thanks to the strong coloring power, the rice grains are embellished with a pleasant and captivating gold color that makes this dish so special. A little magic that combined with the creamy touch of the creaming, inevitable in the preparation of risottos, will give you a risotto with a unique and unmistakable taste. Call it risotto alla Milanese, or risotto with saffron, in any case it will surprise you with its simplicity!


Read the recipe in English

To make saffron risotto (or risotto alla Milanese), first put the pistils in a small glass, pour water over 1 just enough to cover the pistils completely, stir 2 and leave to infuse for the whole night, in this way the pistils will release all their colour. So prepare the vegetable broth, a liter will be needed for the recipe. Peel and finely chop the onion 3 so that it can melt during cooking and not be perceived while savoring the risotto.

In a large saucepan, pour 50g of butter taken from the total dose required 4melt it over low heat, then pour in the chopped onion 5 and let it simmer for 10-15 minutes, adding broth to prevent the sauté from drying out 6: the onion must be very transparent and soft.

Once the onion is stewed, add the rice 7 and toast it for 3-4 minutes, so the beans will seal and keep cooking well. Deglaze with the white wine 8 and let it evaporate completely. At this point proceed with cooking for about 18-20 minutes, adding the broth a ladle at a time, as needed, as it is absorbed by the rice 9: the grains must always be covered.

Five minutes before the end of cooking, pour the water with the saffron pistils that you had infused 10, stir to flavor and give the risotto a nice golden colour. After cooking, turn off the heat, add salt 11stir in the grated cheese and the remaining 75 g of butter 12,

mix and cover with the lid 13 let it rest for a couple of minutes, at this point the saffron risotto is ready 14serve it piping hot, garnishing the dish again with a few pistils 15.